
Fifteen years ago when I bought my bread machine all I knew how to do with it was a buy a boxed mix, dump it in and press start. The problem with that is that prepared mixes are pretty expensive and they’re just not that easy to find anymore. These days we use it for all sorts of things like making pizza dough and cinnamon rolls, and for experimenting with different varieties of homemade bread like this yummy Cheesy Italian Herb Bread.
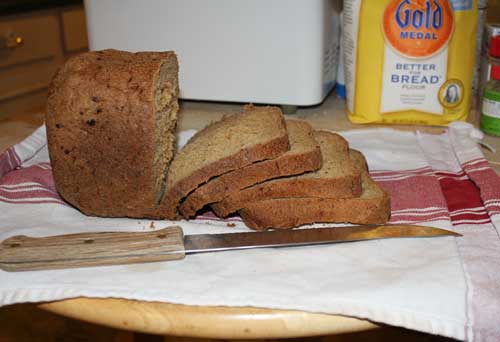
Cheesy Italian Herb Bread
Yield – 1 1/2 pound loaf
Preparation Time – 15 minutes
Cooking Time – 3 hours
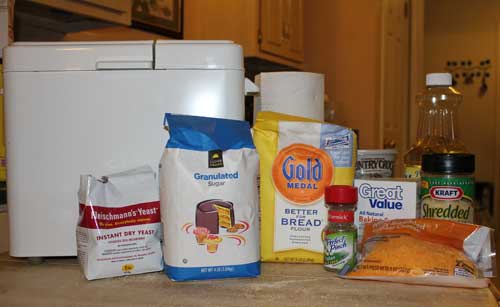
Ingredients
- 1 1/8 cups water
- 1 1/2 tablespoons vegetable oil
- 1/2 cup shredded cheddar cheese
- 3 tablespoons grated Parmesan cheese
- 1/2 teaspoon salt
- 1 tablespoon sugar
- 3/4 teaspoon baking soda
- 1 1/2 teaspoons Italian seasoning
- 3 cups bread flour
- 1 1/2 teaspoons yeast
- 3 tablespoons butter or margarine
Directions
- Add ingredients to your bread machine according to the manufacturer’s instructions, or you can follow these general guidelines.
- In the order listed above place the wet ingredients in the machine’s bread pan first, then the dry ingredients.
- After adding the bread flour make a small indentation in the middle for the yeast, then divide the butter into four parts and place a portion in each corner.
- Bake on the medium color setting.

(For those of you who don’t have a bread machine, I highly recommend getting one! Especially if you have a growing family.)
Pam M says
My bread machine has been a God-send. In an effort to eliminate overly processed, chemical laden foods I began to learn to make my own bread…by hand. I enjoy knowing that I have that skill, but it was pretty time consuming. My bread machine allows me to make healthier options with minimal time invested. The great thing about bread machines now-a-days is that you can readily pick them up at thrift stores and yard sales. Mine came from Goodwill for $10. It didn’t come with a manual, but a quick online search allowed me to find the right one and print it out. I’d say it was a great investment.
Kristin S says
I haven’t used my bread machine in 8 years. This recipe just might motivate me to get it back out.
Denise says
Yay – get it out Pam! Mine was in storage for years while I had all five kids in diapers. After removing the layers of dust it worked like a charm and still does!
Denise says
You go Pam! What a great deal – and thanks for the tip!
Beth says
I’d love more bread machine recipes! I’ve been of the mind set that all you can do is dump a box mix in. 🙂 Since I don’t have any yeast on hand right now, it’ll have to wait til I get to the store to get some, but I’d love to try! Thanks!
Denise says
Awesome – thanks Beth!
cheryl says
Thanks for sharing your recipe, Denise. I received a bread machine as a gift this past Christmas, and I love it. I just haven’t done much more than the few recipes that came in the instruction booklet. I LOVE cheesy herb breads, so I can’t wait to try this one. I’m thinking tomorrow!
Denise says
Let me know how you like it Cheryl since you’re a cheesy bread connoisseur 🙂 Btw, you can use any sort of shredded cheese that you have on hand for this recipe!
Heather says
Thanks so much for this tasty recipe!! I have had a bread machine (garage sale for $10) for years now, and have only used it once…….a failed attempt, I might add! The bread machine has been sitting on the shelves in the basement ever since! I am motivated to get it out and try this recipe!! If there are more bread machine recipes……I would love to see them!
Denise says
I’m so happy that you’re going to give the bread machine another chance, and you’ve motivated me to bring out some more of my fave bread machine recipes (I’m thinking banana bread next!)
Barbie says
What a great recipe! I used to make bread every week for our little family, but the pressures and time-constraints of the past school year forced me to stop. (I’m a sixth grade teacher and mommy to a recent kindergarten grad and a preschooler.) I don’t have a bread machine or a stand mixer — I just did it all. Since my parents recently moved very close by, I hijacked my mom’s bread machine and plan to put it to good use this summer. I’m hoping to get back into a bread-making routine that will be easy to continue next school year with a 1st grader, a kindergartener, and a baby expected in November. ^Crosses fingers for luck.^
Denise says
Wow Barbie – you have your hands full! I’m crossing my fingers for luck for you too, but I’m sure you’re going to love how fast and easy it is to make bread with your hijacked bread machine 🙂
Emily says
Denise, thanks for another great bread recipe to try! My family loves bread, and I love my bread machine – I even make my mom’s Aunt’s “old family recipe” rolls in there – just set for the dough cycle, and when it’s done, I punch the dough down, roll it out into crescents, and let rise/bake. They’re delish! 🙂 And so easy. Keep the great recipes coming!!!
Bonnie says
EGG BREAD RECIPE (2 lb. loaf)
1 1/4 cups WARM water
3 TBLsp butter/OIL – (moister)
3 large egg YOLKS
3 TBLsp nonfat DRY milk
2 tsp salt
3 TBLsp granulated sugar
4 cups BREAD flour
2 tsp active DRY yeast
Select Basic Bread program, to NORMAL or LIGHT. During the mixing process, check to se for bread consistency. IF bread sticks to the side of the pan, sprinkle a TBLsp of flour at a time. IF dough appears too DRY, add a TBLsp of water at a time, until you notice the right consistency, which is MOIST, but leaves the sides of the baking pan. When the bread program finishes, press STOP, and remove bread from machine and cool on rack. (I use an ordinary wooden cutting board – which works just as well.) Remember the bread pan is HOT!! ENJOY!! This EGG BREAD recipe always gets RAVE reviews – it’s a winner!
Denise says
Thanks Bonnie – your Egg Bread sounds scrumptious and I can’t wait to try it 🙂
Samantha says
I’m so glad to find this recipe, I have had my bread machine for 10 years (a wedding gift) and hardly use it. Do you know why most of the time the bread comes out very crisp and dark, I will even choose the setting that isn’t dark? I’m afraid to go lower because I’m afraid the bread won’t get all the way done. Thanks again!
Joshlin says
I can’t wait to try this! I got my bread machine last year at a yard sale for $10 too! I have made a few things in it, but would love to branch out and try new things. Please keep the bread machine recipes coming!!!!
Harriet Dodson says
So I am 7 months later trying this recipe than everyone else but it is smelling heavenly so far! Thanks for sharing! I plan to make the meatballs tomorrow while hubby is home to help.
Denise says
That’s awesome Harriet! I’m in love with my bread machine and this is one of my fave recipes 🙂